APPENDIX B: FX
ARPEGGIATOR
The Arpeggiator is used to chop a single MIDI note into multiple notes, creating rhythmic arpeggiated effects. It provides independent, realtime control of the note value, velocity and time of the newly-generated notes.
 |
At the very top is a macro control, used to select arpeggiator templates, load and save the current template, and step through the list of templates. WARNING: Currently, there's no warning when replacing an edited arpeggio. Be sure to save any work first.
TIMING
These controls specify the tigger and timing information for the generated note events. There are two trigger choices: Either have the arpeggiated effect begin immediately upon receiving a note, or delay it until the start of the next generated note. Typically, you would use the Immediate mode for live playing: you want notes to begin as soon as you hit a key. The On Beat mode can be used when you want the arpeggiator to sync exactly with other notes in a song.
Below the Trigger button is a series of controls that specify the timing information of the new notes. Free or Sync mode determines which step value to use when first starting an arpeggiation -- free will continuously run, picking up where it's left off, while sync will restart at 0. Abs or Rel controls the duration of the notes -- when in Abs mode, the duration is an absolute value specified in the following control. When in Rel mode, the duration is relative to the track's duration. The final control specifies the number of steps in the arpeggio.
NOTE, VELOCITY and TIME
These three shape controls determine their respective values at each step in the arpeggio.
Like any other shape views, the currently selected shape can be manipulated by controls provided for specific parameters. For examp, here is the Factory A Basic arpeggiator after the Period parameter has been manipulated:
 |
By setting up the automation, you can have realtime and sequenced control over any of the available parameters.
AUTOMATION
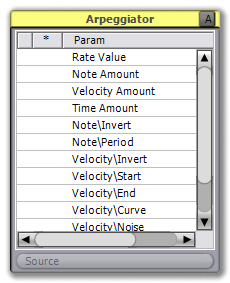
 |
Press the A button in the title to access the automation set up. When in this mode, select a parameter to automate and then move a knob on your MIDI keyboard to make an assignment. To clear the assignment, press the Source button and select Empty.
EXAMPLE 1 - BASIC
To experiment with the arpeggiator, insert it before your favourite synth or select one of the arpeggiator programs found in the Programs/Temper directory. If you're running the Temper standalone application, make sure the track input is set to your MIDI keyboard.
EXAMPLE 2 - REALTIME CONTROL
Before using this example, make sure you've assigned several MIDI macros to one or more knobs on your MIDI keyboard. Do this by twisting a knob: A light flickers in the top left of the temper UI, and text appears. The text will either be "Assign Macro:" if that knob has no assignment, or the name of the MIDI macro. If there's no assignment, right-click the light (left of the text) and select Learn-> and a desired macro. It's a good idea to set up at least A through H.
With several macro knobs assigned, now let's setup some automation in the arpeggiator. Select the desired Arpeggiator FX and click the A "Automation" button in the title, select Note/Invert and move your 'A' knob, then select Note/Period and move your 'B' knob. Again press the A "Automation" button in the title to toggle back to the Arpeggiator controls.
With the knobs assigned, moving them will manipulate the selected parameters. Play some notes and manipulate the knobs, seeing how the shape warps, and how that affects the generated notes.
EXAMPLE 3 - CUSTOM SHAPES
The default patterns are just the beginning. In a few short steps you can create your own custom phrases and use them as the basis for interactively generating new musical passages.
First, open a track editor and put down, say, a measures worth of notes. Now, left-click the desired Arpeggiator FX so its properties are visible in the Selection 1 view. In the track editor use the box select tool (if you have a three-button mouse, just middle-click and drag) to select the notes you just created. The Selection 2 view now has parameters for the selected notes -- click the Shapify button in the Notes title to access the shapify tools. Under the Settings section is a button labeled 'Velocity' -- click it and select 'Note' Now, in the Creating section, there's a drag button to the right of the Categories button. Click it and drag to the shape view in the Note section of the Arpeggiator FX. When you do this, you'll see you have multiple drop choices -- you can either replace the entire shape, or one of the components. Replacing just a component will leave some of the parameters intact so you can still perform realtime manipulations.
TRICK 1 - ON KEY
You can throw an On Key FX after the Arpeggiator FX to keep all the generated events in a specified key, for in-tune and on-key arpeggiations.