SHAPIFY
IntroductionMacro
Groove Theory
Swing Theory
Settings
Creating
INTRODUCTION
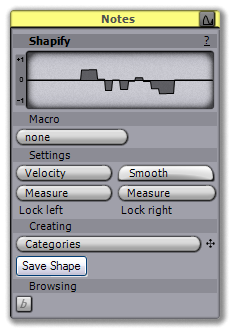
Shapify is the easiest way to create shapes in Temper. It's available by selecting multiple note or controller events and pressing the Shapify button that appears in the Selection 2 title bar. Shapify works by taking the currently selected events and converting them to a stepper or envelope shape based on the active rules.
 |
| Shapify on a note selection |
You can do a variety of things with Shapify: You can grab the pitch or velocity information of one phrase to impose it on another; you can grab timing information to create novel stretch patterns, or to use for groove quantizing or humanizing effects; you can grab an interesting section of music and use it as an envelope for a note decor, etc.
MACRO
The Macro menu provides several prebuilt settings for easily generating shapes appropriate to specific tasks. Choosing any of the macros will disable the various settings.
- Groove. Convert the selected events into a shape that can be used to quantize events to fit the groove rhythm. When applying a groove, each event will be quantized to the closest note in the original groove pattern. This macro expects monophonic data, as it converts all timing info into a single shape.
- Polyphonic Groove. Like groove, but each row of notes (i.e. C4, C#4, etc.) is converted into its own shape. This is useful primarily for percussion kits: Each drum will have its own independent groove. This option is only available from the Notes inspector.
- Swing. Swing is the opposite of groove: In use, it takes the selected events and shifts them by the swing amount. This can be used to create a 'humanizing' feel or other effects. The amount to swing each note by is determined by the perform time of each note used to create the swing shape, where perform times that occur left of the event will swing left, and perform times right will swing right. You can, for example, create a "lazy snare" effect that delays each offbeat by a short amount. If no notes in the selection have a perform time then the shape will be empty. Since swing requires perform time, you must have a license to use it.
- Polyphonic Swing. Like swing, but each row of notes (i.e. C4, C#4, etc.) is converted to its own shape. Since polyphonic swing requires perform time, you must have a license to use it.
GROOVE THEORY
This section describes how MIDI events are converted into groove shapes, and how those shapes are used to groove quantize other MIDI events. There's nothing in here you need to know in order to create and use groove shapes, this merely provides the theory.
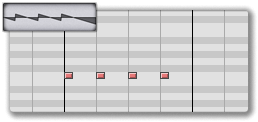
Let's look at a simple groove shape: Below we see a simple quarter note pattern and the shape created when using the Groove macro.
 |
| A quarter note pattern and resulting groove shape |
The shape is used by selecting events and then applying it to start times of each event in the selection. There are really only two rules you need to know in order to understand what's going on:
- In the shape, all values above the center line will shift the events left, and all values below the center line will shift events right. The highest possible value is 1, and the lowest possible value is -1. The center line is 0, meaning no shift.
- The amount of the shift is controlled by the length of the selection that the groove shape was created from. For example, this shape was created from one measure's worth of notes, so a value of 1 at any point along the shape would shift events left by a measure (of 4/4 time), and a value of -1 would shift events right by a measure.
So how does this shape work?
 |
Notice there are four points on the shape at zero: At the very start, and three subsequent locations, which all correspond to the start of each quarter note in the original selection. It makes sense that when we apply this shape, any events that start at the same time as the notes in the original selection won't be moved at all, since these are the locations we're quantizing to.
Now, look at the first cycle: From the start at zero, it does a slow ramp down, then an immediate change into positive values, then a slow ramp down to zero again. Remember that this describes how to shift all events that fall during the first quarter note from the original selection. What we see happening is that any events up to the halfway point during the first quarter note are shifted left by enough distance to make them align with the start -- this is why the value ramps down, because the further the event is from the start, the more it needs to be shifted. Then, suddenly, at the halfway point during the first quarter note, the value goes positive. Now, any further events are shifted right, because after the halfway point, the second quarter note is the closest quantize value. This pattern continues into the last quarter note: There are no subsequent notes, so it's a long negative ramp to quantize everything to the fourth quarter note.
Here are a couple further examples.
 |
Here's the same quarter note pattern, but shortened to sixteenths. Notice that the shape is exactly the same. We're quantizing events to the start times, so the duration of the notes is unimportant.
 |
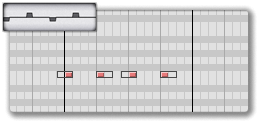
Here's an arbitrary pattern that simply shows the distance between notes determining the length of ramps and zero crossing points in the final shape.
SWING THEORY
This section describes how MIDI events are converted into swing shapes, and how those shapes are used to swing offset other MIDI events. There's nothing in here you need to know in order to create and use swing shapes, this merely provides the theory.
Let's look at a simple swing shape: Below we see a simple pattern of sixteenth notes on each beat in a 4/4 measure. Remember that swing shapes require notes that have perform times, so for this pattern we've shifted the perform time left on beats 1 and 3 and right on beats 2 and 4.
 |
| A simple pattern and its resulting swing shape |
The shape is used by selecting events and then applying it to start times of each event in the selection. Swing shapes are actually identical to groove shapes in the rules used to apply them, so they have the exact same rules that determine their behaviour:
- In the shape, all values above the center line will shift the events left, and all values below the center line will shift events right. The highest possible value is 1, and the lowest possible value is -1. The center line is 0, meaning no shift.
- The amount of the shift is controlled by the length of the selection that the swing shape was created from. For example, this shape was created from one measure's worth of notes, so a value of 1 at any point along the shape would shift events left by a measure (of 4/4 time), and a value of -1 would shift events right by a measure.
So how does this shape work?
 |
Notice there are four non-zero blocks, each corresponding to the four notes in the original selection. The first and third block are negative values, which will shift times left, and the second and fourth are positive values, which will shift times right. Again, this corresponds to the original selection, where the first and third notes have perform times to the left, and the second and third have perform times to the right. What this shape is saying is that, when applied, any events that fall within the first or third sixteenth notes will be shifted left by a sixteenth, any events that fall within the second or fourth sixteenth will be shifted right by a sixteenth, and events at any other time will not change.
Here are a couple further examples.
 |
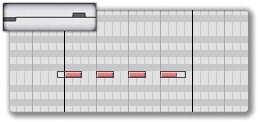
Here's the original pattern, but the notes have been lengthened into eighth notes. Note that this affects the length of the blocks that control shifting: The duration of the original note is important, determining the area in which to perform the shift.
 |
The same pattern as above, but the perform time has been set to zero for the second and third notes. With no perform time, there's no information on how to shift, so only the first and fourth notes produce shape info.
SETTINGS
If Macro is set to none, then there are several settings to control the shape being created.
In the Notes inspector, you can choose the property of the note that gets used for the shape data, basing it on either note velocity or note pitch. Additionally, you can select a smoothing level. A smoothing of 0% will create step sequencer shapes, while anything else will create an envelope, with higher values smoothing the envelope more.
Locking the measures will pad empty space on the left or right side, so the final result is appropriate for applying to measures.
CREATING
Once you've got the desired shape, select any categories you want the shape to be a part of (used by the Morph slider, although this behaviour might disappear in a future release), then press Save Shape. You can either supply a name or leave the Save shape as... window blank to take the default. If the shape is successfully created, the new shape's key will appear below the Save Shape button, and the browser 'B' button will become active, allowing you to go directly to the shape in the Shapes manager.
Alternatively, click the drag button and drag the shape directly to another shape view -- valid views will become yellow, and some views will contain complex shapes allowing you to replace specific pieces.
Shapes are saved to C:\Documents and Settings\(your account)\My Documents\Angry Red Planet\Temper\shapes\ as editable .xml files.