THE SONG
IntroductionTracks
Audio Tracks
Midi Tracks
Program Tracks
Multiple Takes
Busses
Control Bar
The Grid
Groups
Ruler
Phrases
Arranging
Selecting
Separating
Merging
Expanding/Contracting
FX
INTRODUCTION
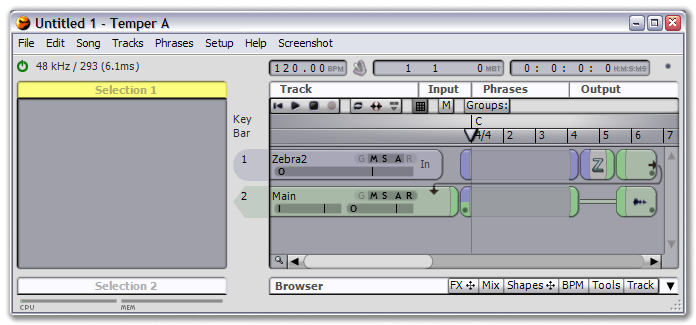
Songs are based on a pipeline design: Data enters at the left of a track from the first FX, flows through any input FX, arrives at the Phrases area where it can be recorded, then is sent out any output FX to the final destination, which might be a MIDI hardware device, an audio interface, or a buss to the start of another track. By default, Temper acts like an FX chainer, routing data from each FX into the next FX in the track. You can also use it as a modular system, routing data from one track to another and back.
The upper half of a Temper window is devoted to all aspects of managing and arranging your song, including adding and removing tracks, moving phrases, adding and removing FX, routing, and playback control.
 |
| the song view |
At the top is a header listing the four columns: The Track column contains a quick overview of track information, including name, an audio meter if appropriate, and the various state buttons like Mute, Solo, etc. The Input column contains the track's input FX (for example, a MIDI keyboard or an audio device), followed by any processing to be done (for example, placing an On Key FX after the input FX will force all notes played into the selected key) before recording into the Phrases column. The Phrases column stores all the phrases (also known in some sequencers as clips) that hold your MIDI and audio data. Finally, the Output column contains the various output FX, including VST instruments for translating MIDI into audio.
Below the header is a control bar, with the transport and grid controls, as well as the group buttons.
Below the control bar is the song ruler, where time signatures, key signatures, markers and other overview information is displayed.
The main area shows a list of tracks containing the information described above.
At the bottom of the song view, left of the scroll bar, is a magnifying glass for controlling the zoom level. Click and drag left and right to zoom the time, or up and down to change the height of any selected tracks.
TRACKS
Each song is composed of one or more tracks, which store all the song data (in phrases) and processing objects (the input and output FX).
 |
| a MIDI track, a MIDI track feeding into a VST instrument, and an audio track |
Each track has a variety of parameters: A title (which you can change by clicking on the track to edit it in the Selection 1 view), mode buttons, and possibly one or more audio level meters.
Basic track operations are available from the Tracks menu in the main menu bar. You can add new tracks or delete selected tracks (tip: you can select multiple tracks by clicking on a track number and dragging, and delete all of them together).
When adding a track, your first choice is whether to add an audio, MIDI or program track.
Audio Tracks
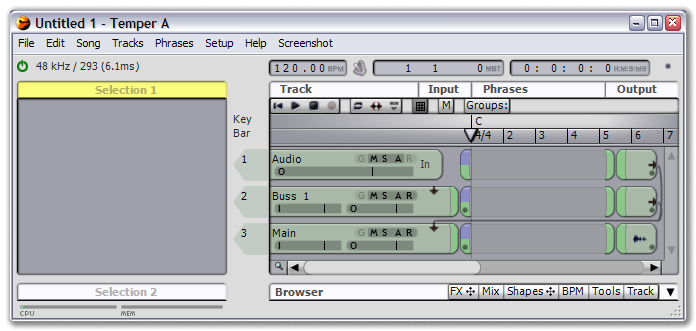
There are three kinds of audio tracks: Empty tracks, which have no input and send output to the main buss (or your ASIO device, if there is no main buss); Buss In tracks, which receive input from any other tracks sending to that buss and send output to the main buss; And the main buss track, which is only available once per song.
 |
| the three basic audio tracks: Empty, buss in, and the main buss |
One thing to note in the above picture, both the Audio track and the Buss 1 track default to sending to the Main buss track. If we added a Buss track, then we probably want to send input to it before it goes to the Mains. Do this by clicking on the output FX of the Audio track to open the FX properties in Selection 1:
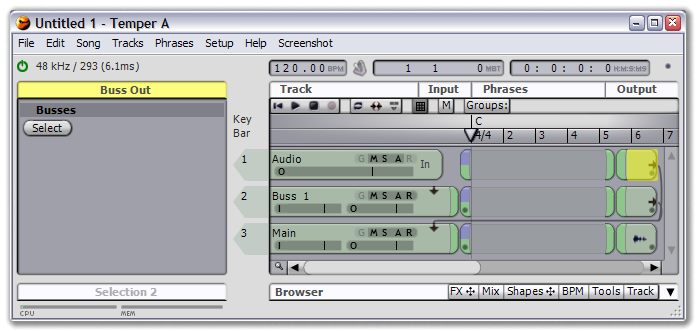 |
We see that the FX is a Buss Out FX, used to send audio to the input of other audio tracks. It has only one property, the Select button. If you click the Select button you'll see a list of all possible destination, which for this song is the Main track and the Buss 1 track. Currently it's sending to Main. If we unselect Main and select Buss 1, we'll see the routing change from the Main track to the Buss 1 track:
 |
| routing from the Audio track to the Buss 1 track to the Main track |
We know have our song routing audio in a serial arrangement. We didn't need to unselect the Main track -- if we hadn't, the Audio track would be sending to both Buss 1 and Main, providing a parallel arrangement.
Create audio phrases either by recording audio directly into a track or by dropping a .wav file (either 16, 24 or 32 bit; sample rate conversion will be performed automatically although for best performance and audio quality, ideally the sample rates match). If you have a three button mouse you can use the middle button to chop audio phrases.
You can add FX to the output of an audio track and sequence their parameters the same way you sequence controllers in MIDI tracks: Double-click the audio track, add a controller strip, and use the + button to add a new parameter. Any VSTs with available parameters will appear in the FX menu. Once you've made a selection, the full MIDI editing tools are available for the new controller.
MIDI Tracks
When choosing Tracks->Add MIDI Track from the main menu, you get a list that may have up to four sections:
- The basic MIDI tracks include three items: Empty, a blank MIDI track with no input or output; Buss In, a track for receiving MIDI data from Buss Out tracks; and Buss Out, a track for sending MIDI data to Buss In tracks.
- The MIDI ports is a list of all installed MIDI hardware ports, for communicating with external MIDI gear.
- The Link To menu is a convenience for creating new tracks linking to existing VST instruments. It will display all VST instruments currently active in the song, and selecting an item will create a new track on the next available MIDI input channel for the selected instrument. For example, if you have a multi channel sampler in the song, and you want to create a new track on the next open channel, select the sampler from the Link To menu.
- The remainder of the list is all VST instruments installed in the system. VSTs are setup via Setup->VST and Audio.
 |
| Two types of MIDI tracks: one on a MIDI device (the E-mu Morpheus), and one on a VST that converts MIDI to audio |
Program Tracks
Program tracks are available via Tracks->Add Program Track. Program tracks are really just template tracks: This menu provides quick access to the programs included for the Temper VST.
You can create your own program tracks by saving songs in the Temper .squ format into the Temper user programs folder, available by clicking on the Windows Start button, selecting My Documents, then navigating to Angry Red Planet/Temper/programs/Temper.
Any songs saved here will appear in the Tracks->Add Program Track menu, with the same directory structure for easy organization. Note that because you save entire songs, you can have a program 'track' that actually adds any number of tracks to your song -- for example, you could have a starter song with basic piano, guitar and drum tracks, and add them all instantly to any existing song.Multiple Takes
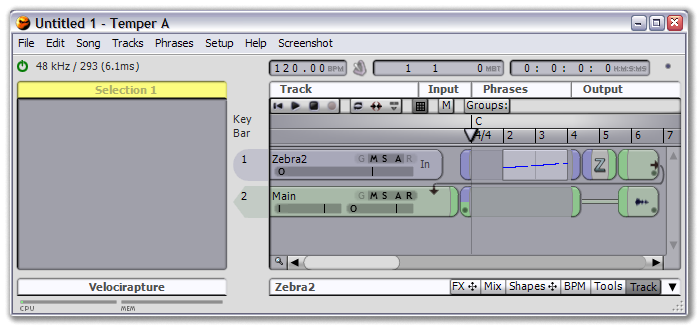
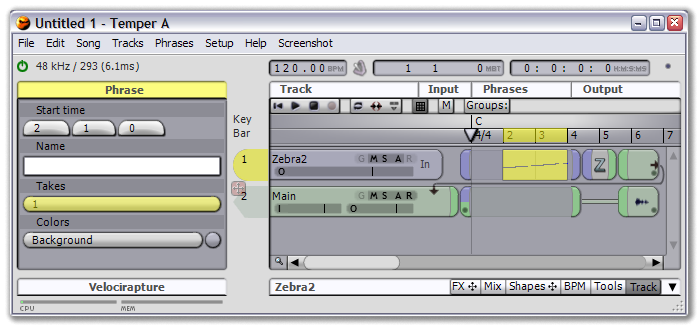
Each track supports the concept of multiple takes: The idea that you have different sets of phrases you can switch between to compare performances. By default each track is on take 1 and every phrase is on take 1; working with multiple takes require that you have one or more phrases on a different take. To assign a phrase to a different take, click on the phrase in the song area, then select the desired take in the Takes menu (here's a tip: Holding down the CTRL key while selecting from the Takes menu will add to the takes, meaning one phrase can be on several takes at the same time). As soon as you place a phrase on take 2 or higher, the track's current take will appear as a number next to the track title. You can click on this number to select the take, which then determines the phrases that are displayed.
A common workflow for multiple takes would be to record, for example, vocals for an entire five minute song. The recording might have pieces you like and pieces you don't, so you select the phrase, place it on a new take, and record the vocals again. Once you're satisfied with the number of takes, switch between them out chop out the best sections from each, assembling the final version back into take 1.
 |
| a track on take 1 with a phrase on take 1 |
 |
| select the phrase to open its properties, and select "New" from the Takes menu |
 |
| selecting "New" assigns the phrase to the next available take and the phrase disappears, because the track is still viewing take 1 -- note the "1" that has appeared next to the track name |
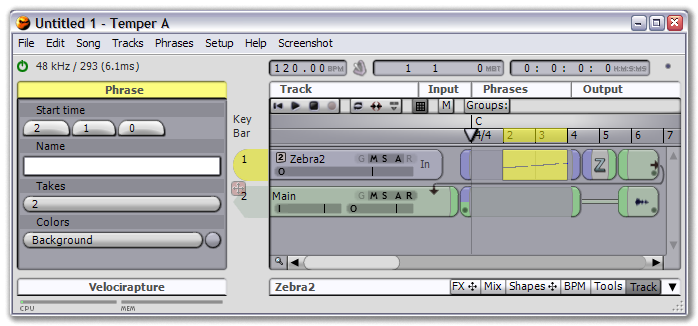 |
| setting the track to take 2 makes the phrase visible again |
BUSSES
Busses are special tracks used to process one or more other tracks (see Busses in Concepts). To add a buss track, select from the new buss track options in the Add Audio Track or Add MIDI Track menus.
Simply having a buss track will do nothing -- you need to feed one or more other tracks into it. This means replacing the output FX of another track with a Buss Out FX, then selecting that Buss Out FX and choosing the name of the buss track you want to feed with the Busses Select button. As soon as you do this, a wire will be drawn from the Buss Out FX to the Buss In FX of the buss track, indicating the signal flow.
If you have a valid ASIO driver, every song by default will have a Main buss track, an audio buss that all other audio tracks feed into, giving you a single volume output for your song. If your song is missing a main buss track, you can add it at any time by selecting Tracks->Add Audio Track->Main Buss.
You can do several things with buss tracks:
- The Mixer optionally displays all audio busses in the song, and can be used to set the volume and pan level for all tracks going through the buss.
- You can add FX to the input of the buss track, and now all tracks sending to the buss will be processed with these FX.
- You can sequence the volume of all audio entering the Phrases area of the buss track. Do this by double-clicking the buss track, adding a controller strip, and selecting Volume (Pre) from the + menu. As stated, this sets the volume for all audio entering the phrases node, so it recorded audio file has the volume changes.
CONTROL BAR
The control bar contains the basic song controls: A set of transport buttons, for rewinding, playing, stopping and recording the song; toggles to turn looping, record punch in/out and the cutting board (currently experimental) on or off; a pair of grid controls to turn the grid on or off and set the grid quantize; and the group buttons.
The Grid
The grid controls are used to set the resolution at which operations are performed in the ruler, and phrases are dragged in the Phrases area. By default, the grid is on and set to a resolution of beats -- that is, when you drag the song position, make a selection, or drag a phrase, it moves based on the beats in the current measure. You can toggle it to move by full measures as well, or turn the grid off for freeform moving (holding ALT will temporarily turn the grid off).
Groups
Groups are used to group multiple tracks together (see the group concept). To create groups, click on the Groups: button next to the grid controls controls in the song view, then type in the names of your desired groups in the Selection 1 view. Once you've defined one or more groups, you can activate them by clicking on the appropriate button that has appeared next to the Groups: button. With a group active, you can now add tracks to the group by pressing the 'G' mode button next to each track's title in the song view.
Currently, groups are used primarily to filter what tracks are displayed when working in the piano roll.
RULER
The ruler contains the basic song overview information: The current key and time signatures, the current song position, and various markers.
 |
| the default ruler |
The song ruler can be resized by clicking on the lip at the bottom and dragging.
 |
| after resizing |
Temper A allows any number of key and time signature changes. To add a new change, right click at the desired location in the ruler and select from the menu item. Left click on the resulting item to open its properties in Selection 1 for editing. To remove, right click and select Key->Remove for key signatures, or the previous meter for time signatures (i.e., if your song starts at 4/4 and has a 2/4 change you want to remove, right click on 2/4 and select 4/4).
Additionally, the ruler allows up to 9 markers. To place a marker, right click at the desired location and select Add Marker. Markers let you rapidly move about your song: Pressing a number on the numeric keypad will move the song position to the respective marker. Left click on a marker and drag it to move it to a new location.
 |
The markers can work in conjunction with the loop points: If you turn on looping via the keyboard shortcut (see Song->Loop in the menu bar for the key command) while the mouse is in the ruler, it will automatically scope looping to the nearest markers.
PHRASES
Phrases contain all audio and MIDI data in the song. You can edit MIDI data directly by double-clicking a track at the desired point, or you can use the Phrases menu in the main menu bar to do high level operations like moving entire phrases, or merging and separating them, discussed in the Arranging section below.
Click on a phrase to access its properties in the Selection 1 view.
The phrase properties let you precisely set the start time, give the phrase a name, assign it to a specific take, or change the colors.
Audio phrases have additional properties: You can directly set the end time, you are provided with basic file info (hover over the file name to see the full path), and you can Edit the file in an external editor. Your preferred editor can be set directly by selecting the Setup->VST and Audio page, or it will be requested the first time you try to Edit a file.
ARRANGING
Arranging phrases consists of the basic phrase management tools, such as separating, merging and moving. These operations are all based on the current selection.
Selecting
A selection is composed of two things: One or more tracks, and a time range.
You can select a single track by clicking on its track number.
 |
| two unselected tracks |
 |
| a selected track |
You can select multiple tracks by clicking on a track number and dragging to other tracks.
 |
| two selected tracks |
The selection can be cleared at any point by clicking in empty space, such as anywhere below the last track, or on a track with no phrases. Additionally, you can add or remove a track from the selection by holding the SHIFT key while clicking on the track number.
You can select a time range by clicking in the song ruler and dragging.
 |
| a selected range |
If no tracks were selected then all tracks will be selected, otherwise the track selection is maintained. The time selection locks to the current grid (by measure, by beat, or freeform), and after making the selection you can hover over either end to increase or decrease by the current grid.
Separating
Separating means cutting one phrase into multiple phrases. With a selection made, we have one basic separate operation, . This will cut the selection at either end. In any MIDI track with multiple phrases within the selection range, all the phrases are merged before being separated from the phrases outside the selection.
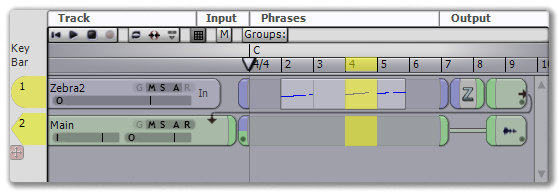 |
| select a range... |
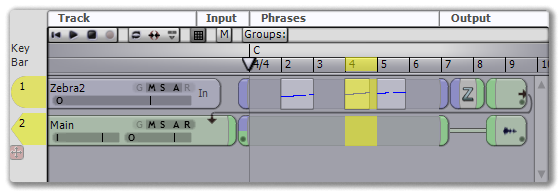 |
| ...and separate |
There are two shortcuts for separating: Choosing will separate all selected tracks (or all tracks if non are selected) at the current song position.
If you have a three button mouse, the middle button will separate at the click point.
Merging
Any MIDI tracks with selected phrases can be merged. This is useful when you've recorded several parts on top of each other and want everything together in a single phrase. Just like separating, choose a time range, select your tracks, and choose .
 |
| merged |
Expanding/Contracting
You can use the expand and contract operations to take all or part of your song and shift it left or right. Like separating and merging, these operations are based on a time range and track selection.
 |
| a selected range of time that will be expanded/contracted |
With the range and tracks selected, choose to shift the events in your tracks right by the selected duration. Blank space is inserted through the selection range. Note that everything from the selection range to the end of the song is shifted right, even phrases outside of the range.
 |
| the song after expanded the selected range |
The shifts the events in all selected tracks left, causing any phrases within the selection to be deleted. Like Expand, everything from the selection range to the end of the song is shifted, including phrases outside of the range.
 |
| the song after contracting the original selected range |
The expansion operation can have some complicated interactions with time signatures. For example, we can look at a new range to be expanded that includes a time signature change in the middle of the selected time range. (Note in this example that the header meter and tempo rows are also selected; like tracks, by deselecting them they will not be included in the expansion/contraction.)
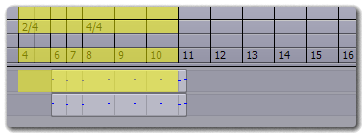 |
| a selected time range with a meter change |
The normal expansion operation creates copies of the meter changes so that the newly expanded region has the same meters as the measures that were moved. This is usually what you expect, and is easier to show than it is to describe:
 |
| expanded time range with duplicated meters |
An alternative kind of expansion is provided by . Instead of duplicating the time signatures within the expanded range, this simply lets all measures retain the meter of the first measure.
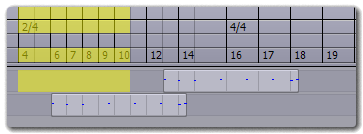 |
| expanded time range with constant meters |
Note that expanding with a constant meter inserts into the song the number of measures you have selected. Because the measures being inserted may have a different meter than the ones in your selection, the actual number of beats being inserted into the song can be larger or smaller than the original selection.
FX
FX control the flow of all MIDI and audio through Temper. There are three basic kinds of FX: Input, for receiving external data (for example, from a MIDI controller or an audio device); Through, for processing data; and output, for sending data outside Temper (for example, to a MIDI synthesizer or audio device).
Input and output FX are obviously specialized and for the most part correspond to various hardware devices. The majority of processing happens with through FX, which are used to transform MIDI data, audio data, and convert MIDI into audio data (i.e., VST instruments). Temper has a variety of built-in FX for MIDI processing, Frakture for basic synthesis, and otherwise relies on VSTs for synthesis and audio processing.
The song view has two panes that store FX: The Input pane allows a single input FX, followed by any number of through FX. The Output pane has any number of through FX followed by a single output FX.
FX are added several ways. The most obvious is to click the FX browser tab and drag to the desired location. A shortcut is to right-click the desired location and select from the menu. Once FX have been added, you can configure their parameters by selecting the FX to open them in the Selection 1 view, or set up routing between different FX or different tracks by clicking on the output pin area and dragging to the desired FX. This opens the Link window, where you can specify exactly what should be connected.
For more information on routing, see the Routing section.
For information on specific FX, see Appendix B.