THE TEMPER WINDOW
IntroductionMetronome
MIDI Macros
Tracks
INTRODUCTION
 |
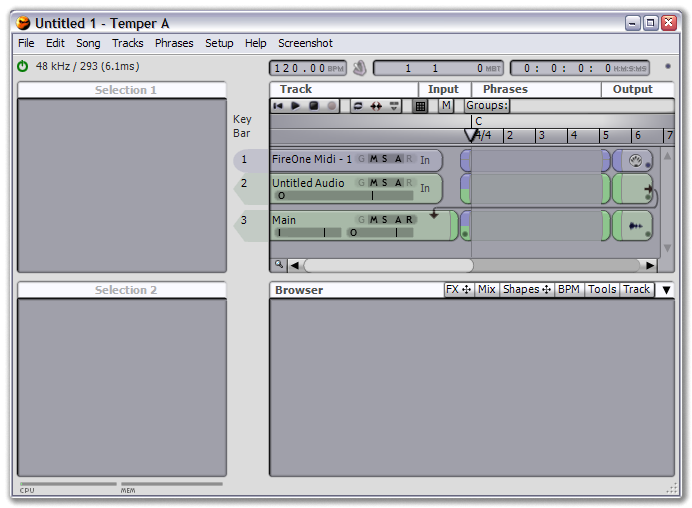
The Temper window is divided into four main sections: The top has the song overview on the right and the Selection 1 view on the left, which displays the parameters for the song's currently selected item. The bottom has the Browser (a context-sensitive area primarily used for track editing) on the right and the Selection 2 view on the left, which displays the parameters for the Browser's currently selected item. Additionally, above the song overview is a line of status information, and below the Browser is the current CPU and memory useage.
This four-pane design describes the basic Temper workflow: Click items in the song or Browser area to see and edit their parameters. This applies to nearly everything in Temper, from tracks to FX to phrases. When more detail is desired, for example to edit a track or VST, a double-click will open the item in either the Browser or a separate window.
The status information has a power button, which will be either green (audio is running), black (audio is off) or red (there was an error loading the selected audio device). You can click on the power button to turn audio on or off, and hover over the error indicator to find out what's wrong.
To the right of the status is the song time information: A master tempo control (double-click to edit the tempo track), a metronome, the song location in measures/beats/ticks and hours/minutes/seconds/milliseconds, and the MIDI macro control.
METRONOME
To access the metronome, click the metronome icon to the right of the tempo display and the metronome properties will appear in the Selection 1 view.
The metronome can be on either will playing, recording or both. Currently, you must have audio running for the metronome to work. For the metronome sound, you can select between the system beep or a Frakture patch.
MIDI MACROS
Temper is designed as both a sequencer and a synthesizer: The VST version includes programs just like any VST, and these programs are available in the standalone as well (just choose Tracks->Add Program Track to browse the list of included programs and add one to the current song). Like any synthesizer, the programs should be designed with macro controls for accessing the most useful parameters. This is where the MIDI macro control comes in. The MIDI macro control lets you assign knobs on your MIDI controller to macros ('A', 'B' etc.) that the included programs have mapped to interesting parameters.
To assign a macro, move any knob on your controller. The activity light will flicker and the name of the controller will be displayed. Click on the name and select the desired mapping from the menu.
TRACKS
When you create a new song, by default Temper will have three tracks: An empty MIDI track on the first available MIDI port, an empty audio track, and the Main audio track (note that the MIDI track won't be created if there are no MIDI ports on your system, and the audio tracks won't be created if you have not selected a valid ASIO audio interface). The main audio track is a buss track: Buss tracks receive audio data from other tracks, signified by arrows from the end of the source tracks to the start of the buss track. By default, all audio will flow through the Main buss track, Try adding a VST track (select Tracks->Add MIDI Track and choose a VST, or Tracks->Add MIDI Track->Frakture if you have no VSTs): You should see its output routed into the Main track.
For more information, see Tracks in the Song section.